Moving virtual machines from VMware vSphere to OpenShift Virtualization is mostly not a technical problem. The copy tooling works. The projects that go wrong are the ones that skip assessment, underestimate storage and networking differences, or try to move everything in one weekend.
This guide is the version I wish I had when I started helping teams with this. It covers how KubeVirt runs a VM on Kubernetes, how to plan waves, how the Migration Toolkit for Virtualization (MTV) works, and what to do on day 2. Commands and manifests come from the official docs linked at the end. Field names and defaults change between releases, so check the docs for your OpenShift and MTV version before you run anything.
How OpenShift Virtualization runs a VM
OpenShift Virtualization is the Red Hat product built on the upstream KubeVirt project. The KubeVirt architecture page describes the idea well: KubeVirt delegates scheduling, networking and storage to Kubernetes, and adds the virtualization part through new custom resources, cluster-wide controllers and per-node daemons.
The objects you will see most:
- VirtualMachine (VM) is the durable definition. It gives you start, stop and restart control and keeps the instance running if it should be running. This is what you manage and what you put in Git.
- VirtualMachineInstance (VMI) is the running instance. When a VM owns a VMI, you manage it through the VM. A change to the VM that cannot be applied live sets the
RestartRequiredcondition and takes effect on the next reboot. - virt-launcher pod is the pod that hosts the guest. Each running VMI has one, so
oc get pods -l kubevirt.io=virt-launcheris a useful first look when a VM will not start. - DataVolume and CDI. The Containerized Data Importer (CDI) lets a PersistentVolumeClaim act as a VM disk. A DataVolume is the object through which CDI imports, clones or uploads an image into that PVC.
If you are coming from VMware, think of it this way: the VM is still a VM with a virtio disk and NIC, but it is scheduled, networked and stored through the same Kubernetes primitives as every other workload.
Here is a minimal VirtualMachine, taken from the example in the OpenShift docs. It boots from a golden image DataSource and infers the instance type and preference from it.
apiVersion: kubevirt.io/v1
kind: VirtualMachine
metadata:
  name: rhel-9-minimal
spec:
  dataVolumeTemplates:
  - metadata:
      name: imported-volume-mk4lj
    spec:
      sourceRef:
        kind: DataSource
        name: rhel9
        namespace: openshift-virtualization-os-images
      storage:
        resources: {}
  instancetype:
    inferFromVolume: imported-volume-mk4lj
    inferFromVolumeFailurePolicy: Ignore
  preference:
    inferFromVolume: imported-volume-mk4lj
    inferFromVolumeFailurePolicy: Ignore
  runStrategy: Always
  template:
    spec:
      domain:
        devices:
          video:
            type: virtio
        memory:
          guest: 512Mi
        resources: {}
      terminationGracePeriodSeconds: 180
      volumes:
      - dataVolume:
          name: imported-volume-mk4lj
        name: imported-volume-mk4lj
You can generate that manifest with virtctl create vm --name rhel-9-minimal --volume-import type:ds,src:openshift-virtualization-os-images/rhel9, apply it with oc create -f, and start it with virtctl start rhel-9-minimal. You will rarely write these by hand for migrated VMs, because MTV creates them, but you need to be able to read them.
Assess before you migrate
I split assessment into four questions per VM.
- Is the guest supported? The guest OS has to be supported on OpenShift Virtualization and convertible to KVM with virt-v2v. Red Hat publishes lists of certified guest operating systems and of supported conversions. Look up each OS version you run, including the old ones nobody wants to talk about.
- What does it depend on? Pass-through devices (GPU, USB), shared disks, vSAN-specific features, hibernated VMs and NVMe disks all need a decision. The MTV docs state that hibernated VMs and VMware NVMe disks are not supported, and they have a separate procedure for shared disks.
- What network identity does it have? Static IPs, VLANs, firewall rules tied to addresses, load balancers and DNS matter more than CPU and RAM.
- What is the tolerable downtime? This decides cold or warm migration, and whether the VM goes in an early or late wave.
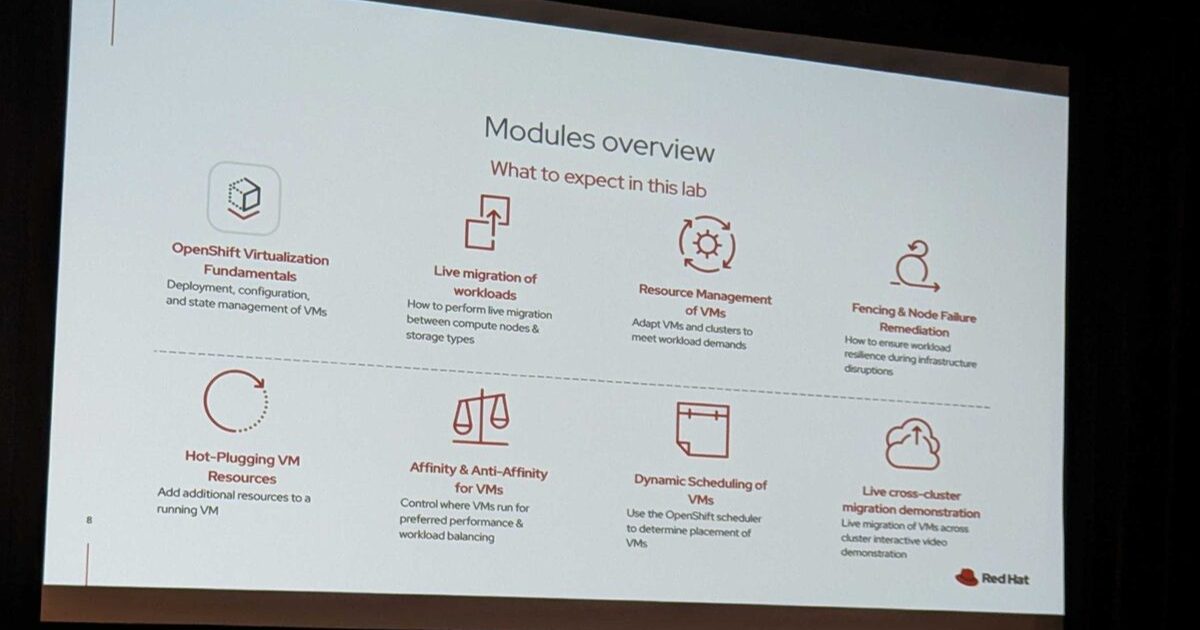
A no-cost migration assessment report was among the resources shared at the Red Hat Summit 2026 operations workshop (see the event write-up), and MTV validates VMs against its rules before a plan runs. Neither replaces your own inventory. Export vCenter data, tag the VMs, and build a spreadsheet you actually trust.
Wave planning
My default structure:
- Wave 0, pilot. Five to ten low-risk VMs: dev and test, stateless, easy to roll back. The goal is to prove the pipeline, not to move capacity.
- Waves 1 to N, by application. Move an application’s VMs together, not by cluster or datastore. Dependencies cross VM boundaries.
- Last waves. Databases with tight downtime, appliances, and anything with licensing tied to hardware identity.
Keep the source VM powered off but intact for a defined rollback window after each cutover. Deleting it on day one is how a bad migration becomes an outage.
Install and prepare MTV
The Migration Toolkit for Virtualization is Red Hat’s supported distribution of the upstream Forklift project. Forklift migrates VMs at scale to KubeVirt and supports several source types besides VMware, including OVA, EC2, Hyper-V, oVirt and OpenStack. This guide only covers vSphere. MTV installs as an operator, and its resources live in the openshift-mtv namespace by default.
Before the first plan, check these items from the MTV VMware prerequisites:
- Use a compatible vSphere and MTV version pair. The docs include a compatibility table per release.
- The credentials need at least the minimal set of VMware privileges. The docs warn that granting permissions only on the VM itself is not enough. Permissions are needed at the datacenter level and must propagate to child objects.
- The target namespace must reach vCenter and the ESXi hosts. NetworkPolicies that block egress from the target namespace make the migration fail.
- Disable hibernation on the source VMs.
- For warm migration, VMware Tools must be installed and changed block tracking (CBT) must be enabled on each VM and each disk.
- If you migrate more than 10 VMs from one ESXi host in the same plan, the docs say to increase the host’s NFC service memory.
- Remove anti-virus agents from source VMs before migrating, as the docs strongly recommend.
The VDDK image
MTV can use the VMware Virtual Disk Development Kit (VDDK) to read disks from vSphere. The docs call building a VDDK image optional but strongly recommended, because without it migration speeds can be significantly lower. They also say a VDDK image is required if the source VMs are backed by vSAN. In practice I treat it as mandatory.
You download the VDDK archive from VMware yourself, build a small image, and push it to a registry your cluster can pull from. The docs show this procedure:
tar -xzf VMware-vix-disklib-<version>.x86_64.tar.gz

cat > Dockerfile <<EOF
FROM registry.access.redhat.com/ubi8/ubi-minimal
USER 1001
COPY vmware-vix-disklib-distrib /vmware-vix-disklib-distrib
RUN mkdir -p /opt
ENTRYPOINT ["cp", "-r", "/vmware-vix-disklib-distrib", "/opt"]
EOF

podman build . -t <registry_route_or_server_path>/vddk:<tag>
podman push <registry_route_or_server_path>/vddk:<tag>
Two caveats from the docs: do the build on a file system that preserves symlinks, and note that storing the image in a public registry might violate the VMware license terms. Use your internal registry.
Providers, maps and plans
MTV models a migration with a few custom resources in the forklift.konveyor.io/v1beta1 API. You can create them in the web console wizard or with oc. I use the console for the pilot and YAML in Git once the pattern is stable.
Provider. One for the vSphere source and one for the destination. If MTV is installed on the target cluster, a local destination provider already exists, shown as <destination_provider> below. The source provider takes a Secret with credentials:
apiVersion: v1
kind: Secret
metadata:
  name: vsphere-creds
  namespace: openshift-mtv
  labels:
    createdForProviderType: vsphere
    createdForResourceType: providers
type: Opaque
stringData:
  user: <user>
  password: <password>
  insecureSkipVerify: "false"
  cacert: |
    <ca_certificate>
  url: https://<vCenter_host>/sdk
---
apiVersion: forklift.konveyor.io/v1beta1
kind: Provider
metadata:
  name: vcenter-prod
  namespace: openshift-mtv
spec:
  type: vsphere
  url: https://<vCenter_host>/sdk
  settings:
    vddkInitImage: <registry>/vddk:<tag>
    sdkEndpoint: vcenter
  secret:
    name: vsphere-creds
    namespace: openshift-mtv
Do not set insecureSkipVerify to "true" outside a lab. Provide the CA certificate instead.
NetworkMap. Maps each source port group to a destination. Allowed destination types are pod, multus and ignored. The source can be identified by id (the vSphere moRef) or name.
apiVersion: forklift.konveyor.io/v1beta1
kind: NetworkMap
metadata:
  name: prod-networks
  namespace: openshift-mtv
spec:
  map:
    - source:
        name: VM Network
      destination:
        type: pod
    - source:
        name: app-vlan-100
      destination:
        type: multus
        name: bridge-network
        namespace: <nad_namespace>
  provider:
    source:
      name: vcenter-prod
      namespace: openshift-mtv
    destination:
      name: <destination_provider>
      namespace: openshift-mtv
StorageMap. Maps each source datastore to a StorageClass, with an access mode of ReadWriteOnce or ReadWriteMany. The access mode is required for standard VMware migrations.
apiVersion: forklift.konveyor.io/v1beta1
kind: StorageMap
metadata:
  name: prod-storage
  namespace: openshift-mtv
spec:
  map:
    - source:
        id: <source_datastore_moref>
      destination:
        storageClass: <storage_class>
        accessMode: ReadWriteMany
  provider:
    source:
      name: vcenter-prod
      namespace: openshift-mtv
    destination:
      name: <destination_provider>
      namespace: openshift-mtv
Newer MTV releases also document a storage copy offload option for SAN arrays from several vendors. I have not used it in production, and its availability depends on your MTV version and storage vendor, so read that section of the docs for your release if you run a listed array.
Plan. Ties the source VMs, the two maps and the target namespace together.
apiVersion: forklift.konveyor.io/v1beta1
kind: Plan
metadata:
  name: wave-0-pilot
  namespace: openshift-mtv
spec:
  warm: false
  provider:
    source:
      name: vcenter-prod
      namespace: openshift-mtv
    destination:
      name: <destination_provider>
      namespace: openshift-mtv
  map:
    network:
      name: prod-networks
      namespace: openshift-mtv
    storage:
      name: prod-storage
      namespace: openshift-mtv
  targetNamespace: wave-0
  preserveStaticIPs: true
  vms:
    - id: <source_vm_moref>
    - name: <source_vm_name>
Migration. Creating a Migration resource runs the plan:
apiVersion: forklift.konveyor.io/v1beta1
kind: Migration
metadata:
  name: wave-0-run-1
  namespace: openshift-mtv
spec:
  plan:
    name: wave-0-pilot
    namespace: openshift-mtv
A few Plan fields deserve attention. preserveStaticIPs exists because vNIC names change during migration, so a guest with a static IP tied to the interface name can lose it. skipGuestConversion defaults to false, meaning virt-v2v converts the guest. Setting it to true switches to raw copy mode, which the docs describe as faster and broader in OS coverage but with trade-offs, so read that section first. With raw copy, useCompatibilityMode (default true) selects SATA and E1000E devices so the VM can boot. Setting it to false only works if virtio drivers are already installed. Check the docs for the exact semantics in your version.
Cold vs warm migration
Cold migration is the default. The source VM is shut down while the data is copied. MTV converts the VM first and fails fast if conversion is impossible, then copies all disk blocks once.
Warm migration copies most of the data while the source keeps running. The precopy stage transfers disks incrementally using CBT snapshots. In the cutover stage the VM is shut down and the remaining data is migrated. RAM contents are not migrated, so this is not a live migration of a running process. The VM is converted at cutover, and blocks can be copied more than once on busy VMs.
To run a warm plan, set warm: true and add a cutover timestamp to the Migration resource, in ISO 8601 format with a UTC offset. The docs state that a warm plan without a cutover value runs only the precopy stage. That is useful: you can start precopy days ahead and schedule the cutover window with the application owner.
How I choose: cold for anything that can take a maintenance window, because it is simpler and fails earlier. Warm for large disks or short windows, after proving that CBT and VMware Tools work on those specific guests. For Windows warm migrations, the docs call out that the Volume Shadow Copy Service and the VMware Snapshot Provider service must not be disabled, or snapshot creation fails.
Guest OS and drivers
KVM presents virtio devices for best performance. For a standard cold migration, virt-v2v installs the virtio drivers and edits the guest to run on QEMU/KVM, as the Forklift project describes. The practical points:
- Linux guests are usually straightforward. MTV installs
qemu-guest-agentwhen it can use the guest’s package manager on first boot. If the package manager cannot run then, install the agent yourself, because without it some VM functionality is reduced. - Windows guests need virtio drivers for disk and network. Let the conversion handle it, and test one VM of each Windows version before the wave.
- Raw copy mode skips conversion, so the guest boots with compatibility devices unless virtio drivers are already present.
- VMware Tools stay in the guest after migration. Plan to remove them as a clean-up step, ideally through your existing configuration management. If you manage VMware with Ansible today, the same tooling can drive this clean-up. I covered the VMware side in Ansible for VMware by examples.
Networking
Every VM can use the default pod network. It is fine for east-west traffic with other cluster workloads, but VMs migrated from VLAN-based designs usually need to land on the same L2 segments.
For that, use secondary networks with Multus:
- Install the Kubernetes NMState Operator.
- Create a
NodeNetworkConfigurationPolicythat builds a Linux bridge on the nodes. - Create a
NetworkAttachmentDefinitionthat references the bridge, optionally with a VLAN tag.
apiVersion: nmstate.io/v1
kind: NodeNetworkConfigurationPolicy
metadata:
  name: br1-eth1-policy
spec:
  desiredState:
    interfaces:
      - name: br1
        description: Linux bridge with eth1 as a port
        type: linux-bridge
        state: up
        ipv4:
          enabled: false
        bridge:
          options:
            stp:
              enabled: false
          port:
            - name: eth1
---
apiVersion: "k8s.cni.cncf.io/v1"
kind: NetworkAttachmentDefinition
metadata:
  name: bridge-network
spec:
  config: |
    {
      "cniVersion": "0.3.1",
      "name": "bridge-network",
      "type": "bridge",
      "bridge": "br1",
      "macspoofchk": false,
      "vlan": 100
    }
The NAD and the VM must be in the same namespace. The docs say IP address management (IPAM) in a NAD for VMs is not supported, so addressing stays inside the guest or comes from your existing DHCP. Linux bridge bonding modes 0, 5 and 6 are not supported. The docs also recommend a dedicated Multus network for live migration traffic, so a migration storm does not saturate tenant networks.
Storage
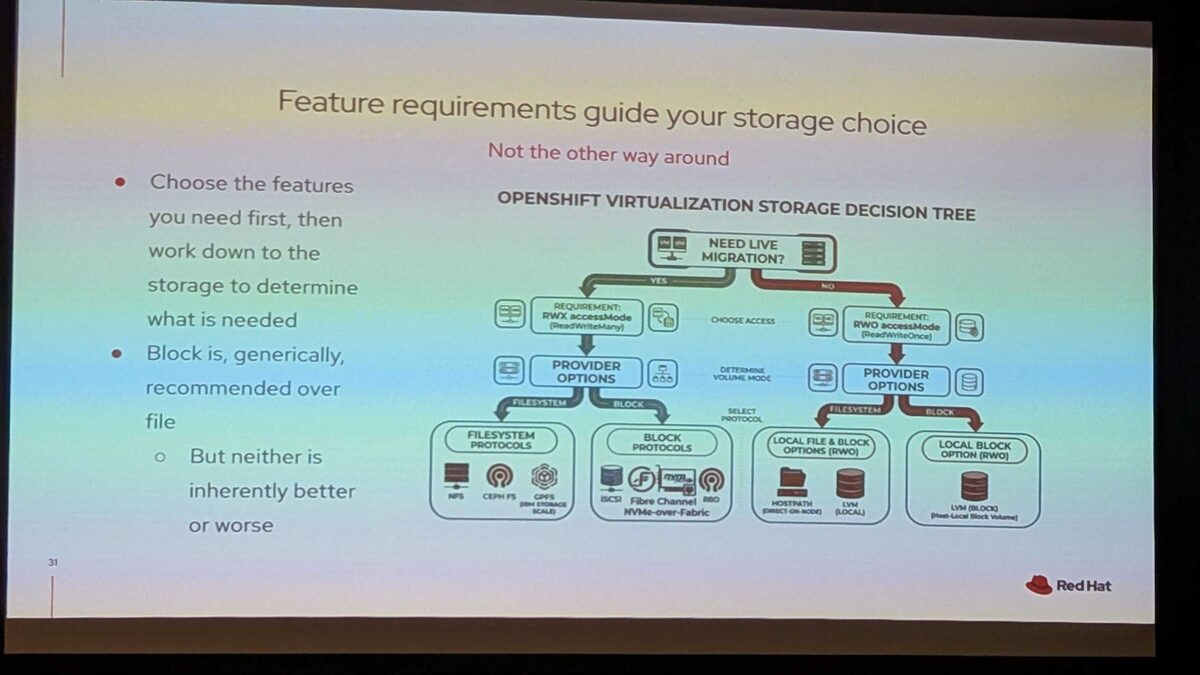
Storage is where I see the most surprises. The storage session write-up from Red Hat Summit 2026 makes the point that feature requirements should drive the storage choice, not the other way around. Its decision tree starts with whether you need live migration, and a yes means RWX.
From the OpenShift docs:
- Live migration requires shared storage with
ReadWriteManyaccess mode. VMs on RWO volumes or with passthrough devices such as GPUs cannot be live migrated, and the docs say to set theirevictionStrategytoNone, which powers them down on node reboots. - For best results use RWX with
Blockvolume mode. The docs explain that Filesystem mode adds a file system layer and a disk image file you do not need. With OpenShift Data Foundation, they recommend Ceph RBD over CephFS. - A default StorageClass is required. Without one, boot source imports stay blocked, and any DataVolume or PVC that does not name a class stays
Pending. - CDI uses storage profiles to pick recommended settings per StorageClass. For a provider CDI does not recognize, you must configure the profile yourself.
The same session warned that PVCs can bind to the wrong type when file and block StorageClasses are mixed in one environment. I would add one rule of my own: set the access mode explicitly in the StorageMap instead of trusting defaults, and write down which StorageClass each tier of VM uses.
Benchmark your CSI driver before the pilot. The session recommended measuring provisioning, mount, snapshot and clone times, and testing node failure with your specific driver. A 40-VM wave will find any weakness in the provisioner.
Day 2
Migration is the start. These are the things I check in the first month.
Live migration and maintenance. Live migration moves a running VM to another node without interrupting the workload, so node drains and cluster updates do not mean VM downtime, provided the requirements above are met. Trigger one with virtctl migrate <vm> or create a migration object:
apiVersion: kubevirt.io/v1
kind: VirtualMachineInstanceMigration
metadata:
  name: migrate-my-vm
spec:
  vmiName: my-vm
In OpenShift Virtualization 4.19 and later the docs say live migration requests are restricted to users with the kubevirt.io:migrate cluster role, so check RBAC. The default evictionStrategy is LiveMigrate. Leave enough spare memory in the cluster to absorb a drain: the docs give the estimate as the maximum number of nodes that can drain in parallel multiplied by the highest total VM memory requests across nodes. The KubeVirt migration settings default to 5 parallel migrations per cluster and 2 outbound migrations per node (parallelMigrationsPerCluster, parallelOutboundMigrationsPerNode). The KubeVirt guide also lists limitations, including constraints on bridge-binding interfaces, so verify your network binding in your version before assuming every VM can migrate.
Density. The operations workshop write-up records a memory density setting that maps to memoryOvercommitPercentage on the HyperConverged resource. Overcommit helps for non-latency-sensitive VMs, but test it before using it for databases.
Backup. Red Hat documents backup and restore of VMs with OpenShift API for Data Protection (OADP), and says OADP 1.3.x or later is required with OpenShift Virtualization 4.14 or later. Snapshots help with quick rollback but are not a backup. Test a restore into a different namespace before you call this done.
Monitoring. The console shows health status, and the docs describe Prometheus queries for vCPU, network, storage and live migration progress, plus dashboards. Add VM health probes (readiness, liveness, guest agent ping) and alerts on migration failures and storage latency.
Skills and licensing. I will not quote prices. The workshop slides, as I recorded them, state that OpenShift Virtualization ships with OpenShift subscriptions and that the OpenShift Virtualization Engine edition targets VM-only use. Confirm entitlements and edition fit with Red Hat or your partner. If the team has never run Kubernetes, budget time for that learning curve. My Kubernetes vs OpenShift comparison and Kubernetes migration strategy guide cover the surrounding decisions.
A realistic checklist
Before the pilot
- Inventory VMs with owner, OS version, disks, NICs, dependencies and downtime tolerance.
- Check each guest OS against the supported and convertible lists.
- Install OpenShift Virtualization and MTV, with a default StorageClass and a storage profile for your CSI driver.
- Choose RWX and Block for anything that needs live migration, and test a live migration on a non-migrated VM.
- Build and push the VDDK image to an internal registry.
- Configure NMState, bridges and NADs for the VLANs you need.
- Create vSphere credentials with datacenter-level privileges, and open firewall paths from the target namespace to vCenter and ESXi.
- Enable CBT and verify VMware Tools on VMs you plan to migrate warm.
Per wave
- Validate the plan in MTV and fix every warning, especially static IP and unsupported device warnings.
- Back up the source VM and confirm the rollback path.
- Run cold plans in the agreed window. For warm plans, start precopy early and schedule the cutover.
- After cutover, check boot, guest agent, IP, DNS, application health and backup enrollment.
- Keep the source VM powered off for the rollback window, then delete it.
After the wave
- Remove VMware Tools, add monitoring and alerts, add the VM to GitOps, and record actual migration times to calibrate the next wave.
Documentation I relied on
- Migration Toolkit for Virtualization documentation from Red Hat, and the upstream Forklift documentation
- Forklift project
- OpenShift Container Platform documentation, Virtualization section for your OpenShift version
- KubeVirt user guide: architecture, live migration and CDI